Getting Started
This guide will help you get started with the Pixel client library and understand its core concepts.
Basic Setup
- Import the necessary modules:
from pixel_client import get_client, PixelApiSettings
- Set up authentication:
You can set up authentication using environment variables or by passing the settings directly. Here's an example using environment variables:
# Get the client with settings parsed from environment variables
client = get_client()
If you prefer to pass settings directly:
settings = PixelApiSettings(
    PIXEL_TENANT="your_tenant",
    PIXEL_USERNAME="your_username",
    PIXEL_PASSWORD="your_password"
)
client = get_client(settings=settings)
Synchronous vs Asynchronous Usage
The Pixel client library supports both synchronous and asynchronous operations. By default, the get_client() function returns a synchronous client. To use the asynchronous client, pass async_=True to the get_client() function.
Synchronous Usage
from pixel_client import get_client
from geojson_pydantic import Polygon

client = get_client()

# Example: List projects
projects = client.list_projects()
for project in projects:
    print(f"Project ID: {project['id']}, Name: {project['name']}")

# Example: Create a new project
new_project = client.create_project(
    name="My New Project",
    description="A test project",
    area_of_interest=Polygon.model_validate(
        {
            "type": "Polygon",
            "coordinates": [[[-10, 10], [-10, 20], [0, 20], [0, 10], [-10, 10]]],
        }
    ),
    tags=["test", "example"],
)
print(f"New project created: {new_project}")
Asynchronous Usage
import asyncio
from pixel_client import get_client
from geojson_pydantic import Polygon


async def main():
    async_client = get_client(async_=True)

    # Example: List projects
    projects = await async_client.list_projects()
    for project in projects:
        print(f"Project ID: {project['id']}, Name: {project['name']}")

    # Example: Create a new project
    new_project = await async_client.create_project(
        name="My New Async Project",
        description="A test async project",
        area_of_interest=Polygon.model_validate(
            {
                "type": "Polygon",
                "coordinates": [[[-10, 10], [-10, 20], [0, 20], [0, 10], [-10, 10]]],
            }
        ),
        tags=["test", "async"],
    )
    print(f"New async project created: {new_project}")


asyncio.run(main())
This guide covers the basics of installing the library, setting up authentication, and performing some simple operations using both synchronous and asynchronous clients. For more detailed information on available methods and advanced usage, please refer to the Examples and API Reference sections.
The next sections will use the synchronous client for simplicity.
Note
The synchrounous client uses the async implementation under the hood. This is to make sure we get somewhat the same performance as the async client, while keeping the API simple to use.
Uploading data
There are currently two main types of data that is supported in Pixel:
-
Image data: This is normal image data, jpeg, png, etc
- In Pixel we refer to image data as images located at a points on a map
-
Raster data: This includes raster data in formats like GeoTIFF.
- In Pixel we refer to raster data as images that cover an area on a map, like satellite imagery or other raster datasets.
-
Point Cloud data: This includes point cloud data in formats like LAS/LAZ.
- In Pixel we refer to point cloud data as 3D point datasets, like LiDAR data.
All the information for a file upload must be defined using PixelUploadFile object. This includes the file path and the MetadataObject that contains the any additional user provided metadata through json_metadata parameter and any fields that the user wants to override in the fields parameter. For information on which fields can be overridden see ImageMetadataFields, RasterMetadataFields and PointCloudMetadataFields classes.
Creating an Image Data Collection and uploading data
Before uploading data, you need to create a data collection within a project. This is done using the create_data_collection method. Then we can upload data from files.
from pixel_client import (
    get_client,
    PixelUploadFile,
    MetadataObject,
    ImageMetadataFields,
)
from pathlib import Path

client = get_client()

# Example: Create a new data collection under project with ID 10
project_id = 10

data_collection = client.create_data_collection(
    project_id=project_id,
    data_collection_type="image",  # This will be data collections that handles images with points
    name="My New Data Collection",
    description="A test data collection",
    tags=["test", "example"],
)

image_files = [
    PixelUploadFile(
        file=Path("path/to/image1.jpg"),  # Replace with your image file path
        # Add custom json metadata for the image
        # and override fields in ImageMetadataFields
        metadata=MetadataObject(
            fields=ImageMetadataFields(
                name="my_image",
                # can override location if needed or if the metadata doesnt contain the gps location
                # location = Point(-10, 10),
            ),
            json_metadata={
                "my_custom_field": "value1",
            },
        ),
    )
]

images, errors = client.upload_multiple_images(
    project_id=project_id,
    data_collection_id=data_collection["id"],
    files=image_files,
    multipart=False,  # If working with large files, set this to True for multipart upload
    # Must define multipart_part_size if multipart is True
    # multipart_part_size=5 * 1024 * 1024,  # 5 MB part size for multipart upload
)
# If any images failed validation, the `errors` list will contain the details.
if errors:
    # each error is a PixelUploadJobError
    # See pixel_client.exceptions.PixelUploadJobError
    print("Errors occurred during image upload:")
    for error in errors:
        print(f"Job with id {error.job_id} failed with error: {error.detail}")
# If no errors, print the uploaded images
if images:
    print("Uploaded images:")
    for image in images:
        print(f"Image ID: {image['id']}, Name: {image['name']}")
errors list in the return value as a PixelUploadJobError object.
Creating a Raster Data Collection and uploading data
To create a raster data collection, you can use the create_data_collection method with the data_collection_type set to one of the supported raster data collection types:
rasterfor generic raster dataRGBfor RGB raster data- Must be a 3 or 4 band raster dataset with uint8 datatype, supports GeoTiff and JPEG formats
DTMfor Digital Terrain Model data- Must be a single band raster dataset with float32 or float64 datatype, supports GeoTiff format
DSMfor Digital Surface Model data- Must be a single band raster dataset with float32 or float64 datatype, supports GeoTiff format
Each raster data collection has defined rules for the data that can be uploaded. These rules are based on the properties of raster data:
- SRID (Spatial Reference ID): Also known as EPSG code
- Cell size/pixel size: The size of the pixel in the coordinate system of the data (usually in meters)
- Image format: GTiff, PNG, JPEG, etc.
- Data type: uint8, float32, float64, etc.
- Number of bands: Number of bands in the raster data
For a generic raster data collection, you can choose "raster" as the type and set any rules you want or not set any. For RGB (Orthophoto), DTM, and DSM, some choices are locked or required:
| Property/Collection Type | RGB | DTM | DSM | raster |
|---|---|---|---|---|
| Format | *GTiff, JPEG | *GTiff | *GTiff | **optional |
| Data type | *uint8 | *must choose | *must choose | **optional |
| SRID | **optional | **optional | **optional | **optional |
| Cell size | **optional | **optional | **optional | **optional |
| Number of bands | *3, 4 | *1 | *1 | **optional |
* Required field
** Optional field
Here's an example of creating a raster data collection and uploading raster files:
from pixel_client import (
    get_client,
    PixelUploadFile,
    MetadataObject,
)
from pixel_client.models import RasterMetadataFields, RasterInfo
from pathlib import Path
import datetime

client = get_client()

# Example: Create a new raster data collection under project with ID 10
project_id = 10

# Define raster information for the data collection
# This defines the rules for what kind of raster data can be uploaded
raster_info = RasterInfo(
    format="GTiff",  # Required for RGB: must be GTiff or JPEG
    data_type="uint8",  # Required for RGB: must be uint8
    num_bands=3,  # Required for RGB: must be 3 or 4
    # Optional parameters:
    # srid=25833,  # EPSG code for the coordinate system (optional)
    # cell_size=(0.1, 0.1),  # Cell/pixel size in coordinate system units (optional)
)

# Create a raster data collection
data_collection = client.create_data_collection(
    project_id=project_id,
    data_collection_type="RGB",  # Options: "raster", "RGB", "DTM", "DSM"
    name="My Raster Collection",
    description="A collection of RGB raster data",
    tags=["raster", "RGB", "example"],
    raster_info=raster_info,  # Pass the raster info to define rules for this collection
)

# Prepare raster files for upload
raster_files = [
    PixelUploadFile(
        file=Path("path/to/raster1.tif"),  # Replace with your raster file path
        # Include any support files (like .tfw, .aux.xml, etc.)
        support_files=[
            Path("path/to/raster1.tfw"),
            Path("path/to/raster1.tif.aux.xml"),
        ],
        # Add metadata for the raster
        metadata=MetadataObject(
            fields=RasterMetadataFields(
                name="raster_2023",
                capture_date=datetime.datetime(
                    2023, 5, 15
                ),  # Date when the raster was captured
            ),
            json_metadata={
                "location": "Oslo",
                "source": "Aerial imagery",
                "resolution": "10cm",
            },
        ),
    ),
    # Add more raster files as needed
]

# Upload the raster files
rasters, errors = client.upload_multiple_rasters(
    project_id=project_id,
    data_collection_id=data_collection["id"],
    files=raster_files,
    multipart=True,  # Use multipart upload for large raster files
    multipart_part_size=50 * 1024 * 1024,  # 50 MB part size for multipart upload
)

# Check for errors during upload
if errors:
    print("Errors occurred during raster upload:")
    for error in errors:
        print(f"Job with id {error.job_id} failed with error: {error.detail}")

# Print information about the uploaded rasters
if rasters:
    print(f"Successfully uploaded {len(rasters)} rasters:")
    for raster in rasters:
        print(f"Raster ID: {raster['id']}, Name: {raster['name']}")
When uploading raster data, you can include support files like .tfw or .aux.xml files that provide additional information about the raster. These files will be uploaded along with the main raster file.
Each raster file uploaded to Pixel will be validated based on the data collection type and the rules defined in the raster_info object. If the file does not meet these requirements, the upload will fail and be added to the errors list in the return value.
Create a Point Cloud Data Collection and uploading data
To create a point cloud data collection, you can use the create_data_collection method with the data_collection_type set to point_cloud. File formats supported for point cloud data are LAS (.las) and LAZ (.laz).
Here's an example of creating a point cloud data collection and uploading point cloud files:
from pixel_client import get_client, PixelUploadFile, MetadataObject
from pathlib import Path

from pixel_client.models import PointCloudMetadataFields

client = get_client()

# Example: Create a new data collection under project with ID 10
project_id = 10

data_collection = client.create_data_collection(
    project_id=project_id,
    data_collection_type="point_cloud",  # This will be data collections that handles point clouds
    name="My New Data Collection",
    description="A test data collection",
    tags=["test", "example"],
)

point_cloud_files = [
    PixelUploadFile(
        file=Path(
            "path/to/point_cloud_file.laz"
        ),  # Replace with your point cloud file path
        # Add custom json metadata for the point cloud
        # and override fields in PointCloudMetadataFields
        metadata=MetadataObject(
            fields=PointCloudMetadataFields(name="my_point_cloud"),
            json_metadata={
                "my_custom_field": "value1",
            },
        ),
    )
]

point_clouds, errors = client.upload_multiple_point_clouds(
    project_id=project_id,
    data_collection_id=data_collection["id"],
    files=point_cloud_files,
    multipart=True,  # If working with large files, set this to True for multipart upload
    # Must define multipart_part_size if multipart is True
    multipart_part_size=50 * 1024 * 1024,  # 50 MB part size for multipart upload
)
# If any point clouds failed validation, the `errors` list will contain the details.
if errors:
    # each error is a PixelUploadJobError
    # See pixel_client.exceptions.PixelUploadJobError
    print("Errors occurred during point cloud upload:")
    for error in errors:
        print(f"Job with id {error.job_id} failed with error: {error.detail}")
# If no errors, print the uploaded point clouds
if point_clouds:
    print("Uploaded point clouds:")
    for pc in point_clouds:
        print(f"point cloud ID: {pc['id']}, Name: {pc['name']}")
Data Retrieval
Once you have uploaded data to Pixel, you can retrieve it using various methods. The Pixel client provides functions for listing, filtering, and retrieving projects, data collections, images, rasters and point clouds.
from pixel_client import get_client
from pixel_client.models import ListParams

client = get_client()

# Example: Retrieve projects
projects = client.list_projects()
print(f"Found {len(projects)} projects")

# Example: Retrieve a specific project with extended information
project_id = 10
project = client.get_project(project_id, extended=True)
print(f"Project name: {project['name']}")
print(f"Project has {len(project['data_collections'])} data collections")

# Example: List data collections with filtering
data_collections = client.list_data_collections(
    project_id=project_id,
    data_collection_type="RGB",  # Filter by type
    tags=["example"],  # Filter by tags
)
print(f"Found {len(data_collections)} RGB data collections with 'example' tag")

# Example: Get images from a data collection with pagination
data_collection_id = 5
images = client.get_images(
    project_id=project_id,
    data_collection_id=data_collection_id,
    params=ListParams(offset=0, limit=10),  # Get first 10 images
)
print(f"Retrieved {len(images)} images")

# Example: Paginate through all images in a data collection
for image in client.paginate_images(
    project_id=project_id,
    data_collection_id=data_collection_id,
    page_size=100,  # Process 100 images at a time
):
    # Process each image one by one
    print(f"Processing image {image['id']}: {image['name']}")

# pagination is supported for all resource types (images, rasters, point clouds, etc.)

# Example: Get rasters from a data collection
rasters = client.get_rasters(
    project_id=project_id,
    data_collection_id=data_collection_id,
    limit=10,  # Get first 10 rasters
)
print(f"Retrieved {len(rasters)} rasters")

# Example: Get point clouds from a data collection
point_clouds = client.get_point_clouds(
    project_id=project_id,
    data_collection_id=data_collection_id,
    limit=10,  # Get first 10 point clouds
)
print(f"Retrieved {len(point_clouds)} point clouds")

# Example: Get a specific image by ID
image_id = 123
image = client.get_image(
    project_id=project_id, data_collection_id=data_collection_id, image_id=image_id
)
print(f"Retrieved image: {image['name']}")

# Example: Get a specific raster by ID
raster_id = 456
raster = client.get_raster(
    project_id=project_id, data_collection_id=data_collection_id, raster_id=raster_id
)
print(f"Retrieved raster: {raster['name']}")

# Example: Get a specific point cloud by ID
point_cloud_id = 789
point_cloud = client.get_point_cloud(
    project_id=project_id,
    data_collection_id=data_collection_id,
    point_cloud_id=point_cloud_id,
)
For detailed information about the structure of response objects, please refer to the API Reference documentation. These documents provide comprehensive information about all API endpoints, request parameters, and response schemas.
Searching data
The API also supports text search and custom filtering logic through the /search endpoint. You can search for images, rasters, point clouds, projects and data collections using various criteria.
from pixel_client import get_client
from pixel_client.models import SearchQuery, SortField

client = get_client()
# Get the search info
search_info = client.search_info("images")
# search info contains the available output fields, filter fields and search capabilities
# {
#    "filterable": ["project_name", "data_collection_name", "tags", "json_metadata.inspection_type", ...],
#    "out_fields": [{"name": "id", "type": "INTEGER"}, {"name": "name", "type": "VARCHAR"}, {"name": "created_at", "type": "DATETIME"}, ...],
#    "supports_text_search": true,
#    "supports_spatial_query": true
# }
search_query = SearchQuery(
    on="images",  # Search on images
    search="damaged",  # Full text search
    filter={
        "and": [
            {"==": ({"var": "project_name"}, "Highway Safety Analysis")},
            {
                "~": ({"var": "json_metadata.inspection_type"}, "%bridge%")
            },  # Can filter on json metadata fields
        ]
    },
    out_fields=[
        "id",
        "name",
        "project_name",
        "location",
        "tags",
        "data_collection_name",
        "json_metadata",
    ],
    sort=[SortField(field="name", direction="asc")],
    # Can also add spatial filters if supported, NB: must be WGS84 and in WKT format
    # intersects="POLYGON((-122.5 37.7, -122.5 37.8, -122.4 37.8, -122.4 37.7, -122.5 37.7))",
    # Can specify limit and offset for pagination (defaults to 100 and 0)
    limit=100,
    offset=0,
    # Can return distinct rows
    distinct=True,
)

search_results = client.search(search_query=search_query)
# The return value is a SearchResult dictionary object containing the results and metadata
count = search_results["count"]  # The number of results in the response
total_count = search_results[
    "total_count"
]  # The total number of results matching the query
print(f"Returned {count} results out of {total_count} matching the query")
results = search_results["results"]  # The list of result objects
for res in results:
    print(
        f"Image ID: {res['id']}, Name: {res['name']}, Project: {res['project_name']}, Tags: {res['tags']}"
    )

# If you want to retrieve all of the results you can use the paginate_search method with a page_size parameter
# NB: This will iterate through all the results matching the query
for res in client.paginate_search(search_query=search_query, page_size=100):
    print(
        f"Image ID: {res['id']}, Name: {res['name']}, Project: {res['project_name']}, Tags: {res['tags']}"
    )
Deleting Data
Deletion of resources vs collections
In Pixel deleting individual resources like images, rasters, point clouds, or attachments is different from deleting collections like projects or data collections. When you delete an image, raster, or attachment, it is permanently removed from Pixel and cannot be restored. This is different from deleting projects or data collections, which can be restored within 60 days after deletion.
Deleting resources (images, rasters, point clouds, attachments)
As noted above, these methods will permanently delete the specified resource and it cannot be restored. Use these methods with caution.
from pixel_client import get_client

client = get_client()
## NB: These methods will PERMANENTLY DELETE the data and cannot be restored
# Example: Delete an image from a data collection
client.delete_image(
    project_id=1,
    data_collection_id=1,
    image_id=1,
)
# Example: Delete a raster from a data collection
client.delete_raster(
    project_id=1,
    data_collection_id=1,
    raster_id=1,
)

# Example: Delete a point cloud from a data collection
client.delete_point_cloud(
    project_id=1,
    data_collection_id=1,
    point_cloud_id=1,
)

# Example: Delete an attachment from a data collection
client.delete_attachment(
    resource_type="data_collection",
    resource_id=1,
    attachment_id=1,
)
Deleting collections (projects, data collections)
When you delete a project or data collection, it is not immediately removed from the system. Instead, it is marked as deleted and can be restored within 60 days. After 60 days, the deleted project or data collection will be permanently removed from Pixel.
from pixel_client import get_client

client = get_client()
# NB: Deletion of data collections and projects are a soft delete. And possible to restore within 60 days.
# After 60 days all the data is permanently deleted.

# Delete a data collection
client.delete_data_collection(
    project_id=123,
    data_collection_id=456,
)

# Restore data collection
restored_dc = client.restore_data_collection(
    project_id=123,
    data_collection_id=456,
)

# Delete project
client.delete_project(
    project_id=123,
)
# Restore project
restored_project = client.restore_project(
    project_id=123,
)
Important note about Plugins
Plugins in Geodata Pixel
Geodata Pixel uses plugins to enable and disable certain features. These plugins are managed by the Pixel administrators and can be configured to enable or disable specific functionalities in the Pixel tenant. The plugins that exists now are:
- optimized_raster
- Enables the optimization of raster data for better performance in ArcGIS Image Services.
- image_service
- Enables the creation and management of ArcGIS Image Services from Pixel data collections
- This plugins is dependent on the
optimized_rasterplugin, so it will not be available if theoptimized_rasterplugin is not enabled.
Optimizing Rasters
Required for ArcGIS Image Services
The optimization of raster data is required for ArcGIS Image Services. If you plan to publish your raster data as an ArcGIS service, you must optimize the rasters first.
Requires optimized_raster plugin
The optimization functionality is only available if the optimized_raster plugin is enabled in your Pixel tenant. If this plugin is not enabled, you will not be able to optimize raster data. See note about Plugins for more information.
For better performance, especially when using rasters in ArcGIS Image Services, you can optimize your raster data. Optimization creates more efficient versions of your rasters that can be served more quickly.
from pixel_client import get_client
from pixel_client.models import NearblackOptions, ListParams

client = get_client()

# Example: Optimize rasters in a data collection
project_id = 10
data_collection_id = 5

# Optimize all rasters in the data collection with the "rgb" profile
# This is required for RGB data collections used in ArcGIS Image Services
optimized_rasters = client.optimize_rasters(
    project_id=project_id,
    data_collection_id=data_collection_id,
    profile="rgb",  # Use "rgb" for RGB data collections
    # No need to specify raster_ids to optimize all rasters
)

print(f"Optimized {len(optimized_rasters)} rasters with 'rgb' profile")

# Example: Optimize specific rasters with the "terrain" profile
# This is required for DTM/DSM data collections used in ArcGIS Image Services
raster_ids = [101, 102, 103]  # IDs of specific rasters to optimize
optimized_terrain_rasters = client.optimize_rasters(
    project_id=project_id,
    data_collection_id=data_collection_id,
    raster_ids=raster_ids,
    profile="terrain",  # Use "terrain" for DTM/DSM data collections
)

print(f"Optimized {len(optimized_terrain_rasters)} rasters with 'terrain' profile")

# Example: Optimize rasters with custom nearblack options
# Nearblack is used to remove black/white borders and artifacts in nodata areas
# Note: Nearblack can only be used with compressed formats like JPEG and WEBP
# and cannot be used with rasters that have an alpha channel
optimized_rasters_with_nearblack = client.optimize_rasters(
    project_id=project_id,
    data_collection_id=data_collection_id,
    profile="rgb",
    nearblack=NearblackOptions(
        enabled=True,  # Enable nearblack processing
        color="black",  # Remove black borders (can also be "white" or a numeric value)
        algorithm="floodfill",  # Algorithm to use (floodfill or twopasses)
    ),
    overview_resampling="average",  # Resampling method for overviews
)

print(f"Optimized {len(optimized_rasters_with_nearblack)} rasters with nearblack")

# Example: Get optimized rasters for a data collection

optimized_rasters = client.get_optimized_rasters(
    project_id=project_id,
    data_collection_id=data_collection_id,
    params=ListParams(limit=100),
)

print(f"Retrieved {len(optimized_rasters)} optimized rasters")

# Example: Delete optimized rasters for a specific raster
raster_id = 101
deleted_optimized_rasters = client.delete_optimized_rasters(
    project_id=project_id,
    data_collection_id=data_collection_id,
    raster_id=raster_id,
    # Optionally specify a profile to delete only optimized rasters with that profile
    # profile="rgb",
)

print(
    f"Deleted {len(deleted_optimized_rasters)} optimized rasters for raster {raster_id}"
)
Note that ArcGIS Image Services require rasters to be optimized with specific profiles: - Use the "rgb" profile for RGB data collections - Use the "terrain" profile for DTM and DSM data collections
Optimizing Point Clouds
For viewing point cloud through http, the point clouds need to be optimized. Optimization creates more efficient versions of your point clouds that can be served more quickly. Optimization of point clouds results into copc (Cloud Optimized Point Cloud) file.
The structure for optimizing point clouds is a little different than for rasters. A uploaded point cloud can only have one optimized version, because there is only one way to create a copc file.
Uploading a copc file
If you upload a copc file directly to Pixel, the original file will be used as the optimized version, and no further optimization is needed. You can delete the optimized point cloud (does not delete the original uploaded data) and re-optimize it if needed.
from pixel_client import get_client

client = get_client()

# Example: Optimize point_clouds in a data collection
project_id = 10
data_collection_id = 5

# Optimize all point_clouds in the data collection with the "rgb" profile
# This is required for RGB data collections used in ArcGIS Image Services
optimized_point_clouds = client.optimize_point_clouds(
    project_id=project_id,
    data_collection_id=data_collection_id,
    # point_cloud_ids=[1, 2, 3] # Optionally specify specific point_cloud IDs to optimize, otherwise all point_clouds will be optimized
)

print(f"Optimized {len(optimized_point_clouds)} point_clouds with 'rgb' profile")

# Example: Delete optimized point cloud for a specific point_cloud
point_cloud_id = 101
deleted_optimized_point_clouds = client.delete_optimized_point_cloud(
    project_id=project_id,
    data_collection_id=data_collection_id,
    point_cloud_id=point_cloud_id,
)

print(f"Deleted optimized point cloud for point_cloud ID {point_cloud_id}")
Working with Attachments
Pixel allows you to attach files to projects and data collections. These attachments can be any type of file, such as documentation, reports, or additional data.
from pixel_client import get_client, PixelAttachmentUpload
from pathlib import Path

client = get_client()

# Example: Add attachments to a project
project_id = 10

# You can add attachments using simple Path objects
project_attachments = client.add_attachments(
    resource_type="project",
    resource_id=project_id,
    files=[
        Path("path/to/document.pdf"),
        Path("path/to/image.jpg"),
    ],
)
print(f"Added {len(project_attachments)} attachments to project")

# Example: Add attachments to a data collection with custom names and descriptions
data_collection_id = 5

# You can use PixelAttachmentUpload for more control over attachment metadata
data_collection_attachments = client.add_attachments(
    resource_type="data_collection",
    resource_id=data_collection_id,
    files=[
        PixelAttachmentUpload(
            file=Path("path/to/specs.pdf"),
            name="Technical Specifications",
            description="Technical specifications for the data collection",
        ),
        PixelAttachmentUpload(
            file=Path("path/to/report.docx"),
            name="Project Report",
            description="Final report for the data collection",
        ),
    ],
)
print(f"Added {len(data_collection_attachments)} attachments to data collection")

# Example: List attachments for a project
project_attachments = client.list_attachments(
    resource_type="project", resource_id=project_id
)
print(f"Project has {len(project_attachments)} attachments")

# Example: List attachments for a data collection with status filter
data_collection_attachments = client.list_attachments(
    resource_type="data_collection",
    resource_id=data_collection_id,
    status="Completed",  # Only show completed attachments
)
print(f"Data collection has {len(data_collection_attachments)} completed attachments")

# Example: Move an attachment from a project to a data collection
attachment_id = project_attachments[0]["id"]
moved_attachment = client.move_attachment(
    resource_type="project",
    resource_id=project_id,
    attachment_id=attachment_id,
    new_resource_type="data_collection",
    new_resource_id=data_collection_id,
)
print(f"Moved attachment '{moved_attachment['name']}' to data collection")

# Example: Delete an attachment
attachment_id = data_collection_attachments[0]["id"]
client.delete_attachment(
    resource_type="data_collection",
    resource_id=data_collection_id,
    attachment_id=attachment_id,
)
print(f"Deleted attachment with ID {attachment_id}")
Harvest Services
Pixel can harvest data from external sources, such as ArcGIS Feature Services, and import it into your data collections. This is useful for keeping your data in sync with external systems.
Harvest services can be configured to map fields from the external source to fields in Pixel, and can be scheduled to run periodically.
from pixel_client import get_client
from pixel_client.models import (
    HarvestServiceCreateInput,
    HarvestServiceUpdateInput,
    HarvestAuthInfo,
    Credentials,
    ApiKey,
    HarvestFieldMapping,
    HarvestFieldMap,
    FieldMapsUpdateInput,
    HarvestFieldMapUpdate,
    HarvestTaskListParams,
    PixelStatusEnum,
)

client = get_client()

# Example: Create a harvest service for an image data collection
project_id = 10
data_collection_id = 5

# Create a harvest service with username/password authentication
harvest_service_with_credentials = client.create_harvest_service(
    project_id=project_id,
    data_collection_id=data_collection_id,
    create_input=HarvestServiceCreateInput(
        name="ArcGIS Online Harvester",
        description="Harvest images from ArcGIS Online",
        url="https://services.arcgis.com/example/arcgis/rest/services/example_service/FeatureServer/0",
        # Authentication information
        auth=HarvestAuthInfo(
            credentials=Credentials(
                username="your_username",
                password="your_password",
                token_url="https://www.arcgis.com/sharing/rest/generateToken",
            ),
            # You can use either credentials or API key, not both
            api_key=None,
        ),
        # Field mappings define how external fields map to Pixel fields
        field_mappings=HarvestFieldMapping(
            maps=[
                # Image fields (name, location, capture_date)
                HarvestFieldMap(
                    model="Image",  # Target model in Pixel
                    field_name="name",  # Field name in Pixel
                    external_field="title",  # Field name in external service
                ),
                HarvestFieldMap(
                    model="Image",
                    field_name="capture_date",
                    external_field="acquisition_date",
                ),
                HarvestFieldMap(
                    model="Image",
                    field_name="location",
                    external_field="geometry",
                ),
                # ImageMetadata fields
                HarvestFieldMap(
                    model="ImageMetadata",
                    field_name="cam_heading",
                    external_field="heading",
                ),
                HarvestFieldMap(
                    model="ImageMetadata",
                    field_name="cam_pitch",
                    external_field="pitch",
                ),
                HarvestFieldMap(
                    model="ImageMetadata",
                    field_name="cam_roll",
                    external_field="roll",
                ),
            ],
            # Extra fields to include in the JSON metadata
            extra_fields=["description", "photographer", "camera_model"],
        ),
        # SQL-like where clause to filter data from the external service
        where_clause="status = 'approved'",
    ),
)

print(f"Created harvest service with ID: {harvest_service_with_credentials['id']}")

# Example: Create a harvest service with API key authentication
harvest_service_with_api_key = client.create_harvest_service(
    project_id=project_id,
    data_collection_id=data_collection_id,
    create_input=HarvestServiceCreateInput(
        name="ArcGIS Enterprise Harvester",
        description="Harvest images from ArcGIS Enterprise",
        url="https://enterprise.example.com/arcgis/rest/services/Photos/FeatureServer/0",
        auth=HarvestAuthInfo(
            credentials=None,
            api_key=ApiKey(
                api_key="your_api_key",
                # api_key_item_id is optional and defaults to None
                # api_key_item_id="abcdef123456789",  # ArcGIS Online item ID (optional)
            ),
        ),
        field_mappings=HarvestFieldMapping(
            maps=[
                # Image fields
                HarvestFieldMap(
                    model="Image",
                    field_name="name",
                    external_field="image_name",
                ),
                HarvestFieldMap(
                    model="Image",
                    field_name="location",
                    external_field="geometry",
                ),
                # ImageMetadata fields
                HarvestFieldMap(
                    model="ImageMetadata",
                    field_name="focal_length",
                    external_field="focal_length",
                ),
                HarvestFieldMap(
                    model="ImageMetadata",
                    field_name="cam_height",
                    external_field="height",
                ),
            ],
        ),
    ),
)

print(f"Created harvest service with ID: {harvest_service_with_api_key['id']}")

# Example: List harvest services for a data collection
harvest_services = client.list_harvest_services(
    project_id=project_id,
    data_collection_id=data_collection_id,
    name="ArcGIS",  # Optional filter by name
    limit=10,  # Optional limit
)

print(f"Found {len(harvest_services)} harvest services")

# Example: Get a specific harvest service
service_id = harvest_service_with_credentials["id"]
harvest_service = client.get_harvest_service(
    project_id=project_id,
    data_collection_id=data_collection_id,
    service_id=service_id,
)

print(f"Retrieved harvest service: {harvest_service['name']}")

# Example: Update a harvest service
updated_service = client.update_harvest_service(
    project_id=project_id,
    data_collection_id=data_collection_id,
    service_id=service_id,
    update_input=HarvestServiceUpdateInput(
        name="Updated ArcGIS Harvester",
        description="Updated description",
        # Update field mappings
        field_mappings=FieldMapsUpdateInput(
            maps=[
                # Add a new field mapping
                HarvestFieldMapUpdate(
                    operation="add",
                    model="ImageMetadata",
                    field_name="hfov",  # Horizontal field of view
                    external_field="field_of_view",
                ),
                # Remove an existing field mapping
                HarvestFieldMapUpdate(
                    operation="remove",
                    model="Image",
                    field_name="capture_date",
                    # Dont need to specify external_field for removal
                ),
                # Update an existing field mapping
                HarvestFieldMapUpdate(
                    operation="update",
                    model="Image",
                    field_name="name",
                    external_field="image_title",  # New external field
                ),
            ],
            # Add new extra fields
            add_extra_fields=["location_name", "weather_conditions"],
            # Remove existing extra fields
            remove_extra_fields=["camera_model"],
        ),
        # Update the where clause
        where_clause="status = 'approved' AND date > '2023-01-01'",
    ),
)

print(f"Updated harvest service: {updated_service['name']}")

# Example: Start a harvest service
# This initiates the harvesting process
client.start_harvest_service(
    project_id=project_id,
    data_collection_id=data_collection_id,
    service_id=service_id,
)

print(f"Started harvest service with ID: {service_id}")

# Example: Get harvest tasks
# These are the individual tasks created by the harvest service
harvest_tasks = client.get_harvest_service_tasks(
    project_id=project_id,
    data_collection_id=data_collection_id,
    service_id=service_id,
    params=HarvestTaskListParams(
        status=PixelStatusEnum.completed,  # Filter by status
        get_new=True,  # Only get new tasks
        limit=100,  # Limit the number of tasks returned
    ),
)

print(f"Found {len(harvest_tasks)} harvest tasks")

# Example: Stop a harvest service
client.stop_harvest_service(
    project_id=project_id,
    data_collection_id=data_collection_id,
    service_id=service_id,
)

print(f"Stopped harvest service with ID: {service_id}")

# Example: Delete a harvest service
client.delete_harvest_service(
    project_id=project_id,
    data_collection_id=data_collection_id,
    service_id=service_id,
)

print(f"Deleted harvest service with ID: {service_id}")
Field Mapping
When creating a harvest service, you need to specify how fields in the external source map to fields in Pixel. There are two target models:
- Image: Contains basic image properties like name, location, and capture_date
- ImageMetadata: Contains additional metadata fields like camera orientation, field of view, etc.
You can also specify extra fields to include in the JSON metadata of the imported images.
Authentication
Harvest services support two authentication methods:
- Username/Password: Provide credentials for services that require basic authentication
- API Key: Use an API key for services that support key-based authentication
Filtering Data
You can use a SQL-like where clause to filter which data is harvested from the external source. This allows you to import only the data that meets specific criteria.
ArcGIS Services
Pixel can publish your data as ArcGIS services, making it available for use in ArcGIS applications and other GIS software.
Superuser Privileges Required
Creating and managing ArcGIS services requires superuser privileges in the Pixel tenant.
Image Service Requires image_service Plugin
The creation of ArcGIS Image Services requires the image_service plugin to be enabled in your Pixel tenant. If this plugin is not enabled, you will not be able to create ArcGIS Image Services. See note about Plugins for more information. Contact your Pixel administrator to enable this plugin.
Data Collection Type Restrictions
ArcGIS services have specific requirements:
- All data collections must be of the same type (image, RGB, DTM, or DSM)
- Rasters must be optimized with the appropriate profile ("rgb" for RGB, "terrain" for DTM/DSM) for image services
Image Service options
When creating an ArcGIS Image Service, you must define a list of data collections to include in the service. The data collections must be of the same type (RGB, DTM, or DSM). The image service creation will fail if the data collections are of different types or if there are no optimized rasters in the data collections. The specific options for the image service can be set through Image Service Options object, which includes:
default_service_srid: The default SRID (Spatial Reference ID) for the service. Must be set to a valid EPSG code.wms_options:enable: Whether to enable WMS (Web Map Service) support for the image service.supported_srids: A list of supported SRIDs for WMS. If not set, the service will support the default service SRID and WGS84.title: The title of the WMS service.abstract: A description of the WMS service.keywords: A list of keywords for the WMS service.
See the example below for how to create an ArcGIS Image Service with these options.
RGB and Terrain Image service
Pixel will automatically create the appropriate ArcGIS Image Service based on the data collection type.
-
RGB data collections will be published as an Processed image service which will just be a simple image service with a single layer
-
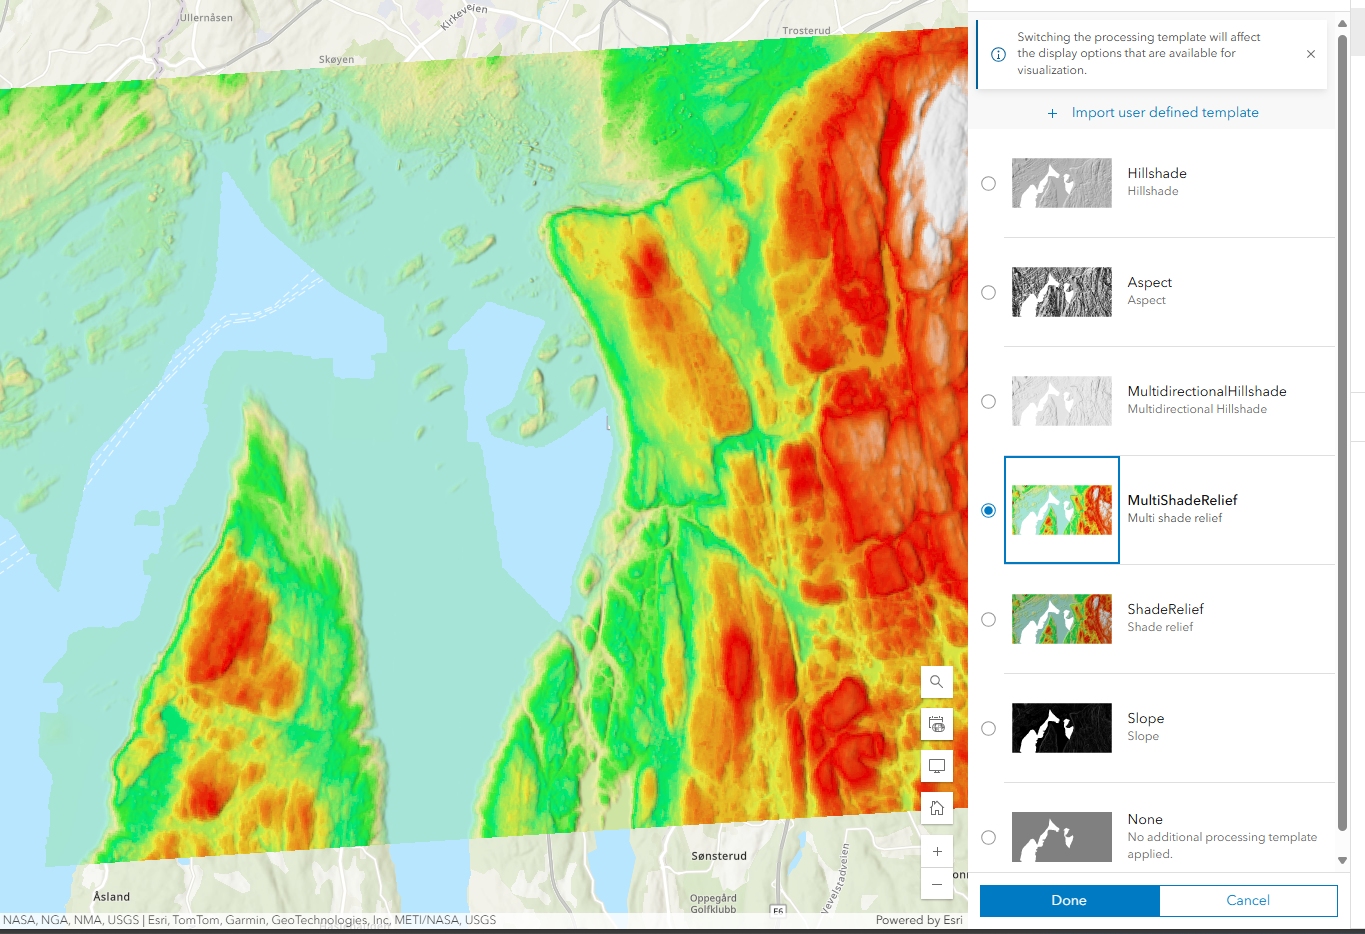
DTM and DSM data collections will be published as an ELevation image service with the available raster functions or wms layers
- Hillshade, Slope, Aspect, MultidirectionalHillshade, MultiShadeRelief, ShadeRelief
- See illustration from ArcGIS Online below
Access Control
ArcGIS services created in Pixel can be restricted to specific Geodata Online (GDO) users. Each Pixel tenant is assigned one or more GDO users that can be used to authenticate with the ArcGIS services. If not defined when creating the service, the service will be accessible to everyone, meaing the service will be public.
You can retrieve the available GDO users for your tenant using the list_gdo_users method:
gdo_users = client.list_gdo_users()
print(f"Available GDO users: {gdo_users}")
Accessing ArcGIS Services
Once an ArcGIS service is running, it can be accessed using the URL returned in the url field of the service response. To authenticate with the service, you need to generate a token from:
https://services.geodataonline.no/arcgis/tokens/generateToken
Use the credentials of one of the GDO users that has access to the service.
Complete Example
from pixel_client import get_client
from pixel_client.models import (
    ArcGISFeatureServiceImageLayerOptions,
    ArcGISFeatureServiceOptions,
    ArcGISFeatureServiceProjectLayerOptions,
    ArcGISImageServiceOptions,
    ArcGISImageServiceWMSOptions,
    ArcgisServiceCreateInput,
    ArcgisServiceCreateOptions,
    ArcgisServiceUpdateInput,
)

client = get_client()

# Example: Create an ArcGIS Image Service
# Note: This requires superuser privileges in the Pixel tenant
# All rasters in the data collection must be optimized with the appropriate profile
# - "rgb" profile for RGB data collections
# - "terrain" profile for DTM and DSM data collections

# First, let's create an Image Service for a RGB data collection
rgb_data_collection_id = 10

# First, get the available GDO users for your tenant
gdo_users = client.list_gdo_users()
print(f"Available GDO users: {gdo_users}")

image_service = client.create_arcgis_service(
    service_type="Image",
    create_input=ArcgisServiceCreateInput(
        name="RGB Orthophoto Service",
        description="ArcGIS Image Service for RGB orthophotos",
        data_collection_ids=[rgb_data_collection_id],  # Must be all RGB type
        options=ArcgisServiceCreateOptions(
            # Restrict access to specific GDO users
            # If None, the service will be accessible to everyone, meaning open
            gdo_users=["gdo_user1", "gdo_user2"],
            image_service_options=ArcGISImageServiceOptions(
                default_service_srid=25833,  # EPSG code for the service
                wms_options=ArcGISImageServiceWMSOptions(
                    enable=True,  # Enable WMS capabilities
                    supported_srids=[25833, 4326],  # Supported coordinate systems
                    title="RGB Orthophoto WMS",
                    abstract="WMS service for RGB orthophotos",
                    keywords=["orthophoto", "rgb", "aerial"],
                ),
            ),
        ),
    ),
)

print(f"Created Image Service with ID: {image_service['id']}")

# Example: Create an ArcGIS Feature Service for an image data collection
image_data_collection_id = 20

feature_service = client.create_arcgis_service(
    service_type="Feature",
    create_input=ArcgisServiceCreateInput(
        name="Image Feature Service",
        description="ArcGIS Feature Service for image data",
        data_collection_ids=[image_data_collection_id],  # Must be image type
        options=ArcgisServiceCreateOptions(
            feature_service_options=ArcGISFeatureServiceOptions(
                image_layer=ArcGISFeatureServiceImageLayerOptions(
                    include_fields=["name", "capture_date"],  # Fields to include
                    enable_oriented_imagery=True,  # Enable oriented imagery capabilities
                    enable_images_as_attachments=True,  # Include images as attachments
                    image_processed_type="blurred",  # Type of image processing
                ),
                project_layer=ArcGISFeatureServiceProjectLayerOptions(
                    include_fields=["name", "description"],  # Fields to include
                ),
            ),
        ),
    ),
)

print(f"Created Feature Service with ID: {feature_service['id']}")

# Example: Start an ArcGIS service
# This deploys the service to ArcGIS Server
service_id = image_service["id"]
started_service = client.start_arcgis_service(
    service_type="Image",
    service_id=service_id,
    wait=True,  # Wait for the service to start before returning
)

print(f"Started Image Service: {started_service['arcgis_service']['name']}")
print(f"Service URL: {started_service['arcgis_service']['url']}")

# Example: Update an ArcGIS service
service_id = image_service["id"]

# IMPORTANT: When updating options, be careful as any None values in the options
# will override existing values. It's recommended to first get the current service,
# then modify only the specific options you want to change.
current_service = client.get_arcgis_service(
    service_type="Image",
    service_id=service_id,
)

# Extract current options to preserve existing values
current_options = ArcgisServiceCreateOptions.model_validate(current_service["options"])

# Ensure image_service_options is available (it will be for Image services)
assert current_options.image_service_options is not None, (
    "Image service options should be available for Image services"
)

# Update only the specific options you want to change
current_options.image_service_options.default_service_srid = 4326
updated_service = client.update_arcgis_service(
    service_type="Image",
    service_id=service_id,
    update_input=ArcgisServiceUpdateInput(
        name="Updated RGB Service",
        description="Updated description for RGB service",
        options=current_options,  # Use the modified current options
    ),
)

print(f"Updated Image Service: {updated_service['name']}")

# Example: Refresh an ArcGIS service
# This is needed after changes to the underlying data
refreshed_service = client.refresh_arcgis_service(
    service_type="Image",
    service_id=service_id,
    refresh_data=True,  # Also refresh the data used by the service
    wait=True,  # Wait for the refresh to complete
)

print(f"Refreshed Image Service: {refreshed_service['arcgis_service']['name']}")

# Example: Stop an ArcGIS service
stopped_service = client.stop_arcgis_service(
    service_type="Image",
    service_id=service_id,
    wait=True,  # Wait for the service to stop
)

print(f"Stopped Image Service: {stopped_service['arcgis_service']['name']}")

# Example: List ArcGIS services
image_services = client.list_arcgis_services(
    service_type="Image",
    name="RGB",  # Filter by name (optional)
    limit=10,  # Limit results (optional)
)

print(f"Found {len(image_services)} Image Services")

# Example: Delete an ArcGIS service
client.delete_arcgis_service(
    service_type="Image",
    service_id=service_id,
)

print(f"Deleted Image Service with ID: {service_id}")
Analysis
Beta feature
Analysis functionality is currently in beta. The available modules and their configuration and parameters may change.
Pixel can run analysis on your data through configurable analysis services. The analysis surface is built around three concepts:
- Module: a type of analysis that can be run. Each module defines the configuration (
config) and per-run parameters (params) it expects. Uselist_analysis_modules()to see the modules available in your tenant. - Service: a configured instance of a module. A service has a
name, themodule_nameit is based on, anenabledflag, and aconfigdictionary. The module of a service is fixed once it is created, but you can update the other fields withpatch_analysis_service— the backend deep-mergesconfig, so you only need to send the keys you want to change. -
Task: a single run of a service. A task has an optional
nameand aparamsdictionary. Tasks are created and then started withrun_analysis_task. A task moves through the following statuses:PENDING→SCHEDULED→RUNNING→SUCCESS/FAILEDA task that has not finished can be cancelled with
revoke_analysis_task, which moves it toREVOKED.
The example below lists the available modules, creates a service, then creates, runs and inspects a task:
from pixel_client import get_client
from pixel_client.models import (
    AnalysisServiceCreateUpdateInput,
    AnalysisTaskCreateInput,
)

client = get_client()

# 1. List the analysis modules available in your tenant.
#    A module describes a type of analysis that can be run, along with the
#    configuration and run parameters it expects.
modules = client.list_analysis_modules()
print("Available analysis modules:")
for module in modules:
    print(f"- {module['name']}")

# 2. Create an analysis service.
#    A service is a configured instance of a module. The `config` dictionary
#    holds the module-specific configuration (see the module definition for the
#    expected keys). `module_name` must be one of the modules listed above and
#    cannot be changed after the service is created.
service = client.create_analysis_service(
    AnalysisServiceCreateUpdateInput(
        name="My analysis service",
        module_name="<module_name>",
        enabled=True,
        config={
            # module-specific configuration
        },
    )
)
service_id = service["id"]
print(f"Created analysis service with ID {service_id}")

# 3. Create a task on the service.
#    A task is a single run of the service. The `params` dictionary holds the
#    per-run parameters expected by the module.
task = client.create_analysis_task(
    service_id,
    AnalysisTaskCreateInput(
        name="My analysis task",
        params={
            # module-specific run parameters
        },
    ),
)
task_id = task["id"]
print(f"Created analysis task with ID {task_id}")

# 4. Run the task. This schedules the task for execution.
client.run_analysis_task(service_id, task_id)

# 5. Check the status of the tasks on the service.
#    Task status is one of: PENDING, SCHEDULED, RUNNING, SUCCESS, FAILED, REVOKED.
for t in client.list_analysis_tasks(service_id):
    print(f"Task {t['id']} ({t.get('name')}): {t['status']}")

# Optionally, revoke a task that has not finished yet.
# client.revoke_analysis_task(service_id, task_id)

# Clean up the task and/or the service when you no longer need them.
# client.delete_analysis_task(service_id, task_id)
# client.delete_analysis_service(service_id)
Module-specific configuration
The keys expected in a service config and a task params depend on the selected module. Inspect the module definitions returned by list_analysis_modules() and the API documentation for the expected fields.